Getting Started with Anava
This guide walks you through deploying Anava to your Google Cloud project and connecting your first Axis camera.
Prerequisites
Before you begin, ensure you have:
- Google Cloud Account with billing enabled
- Axis Camera with IEEE 802.1AR support (Edge Vault)
- Google Chrome browser (required for the camera discovery extension)
- Admin access to your camera's local network
How Anava Works
Anava transforms your Axis cameras into AI-powered security sensors. Here's the high-level flow:
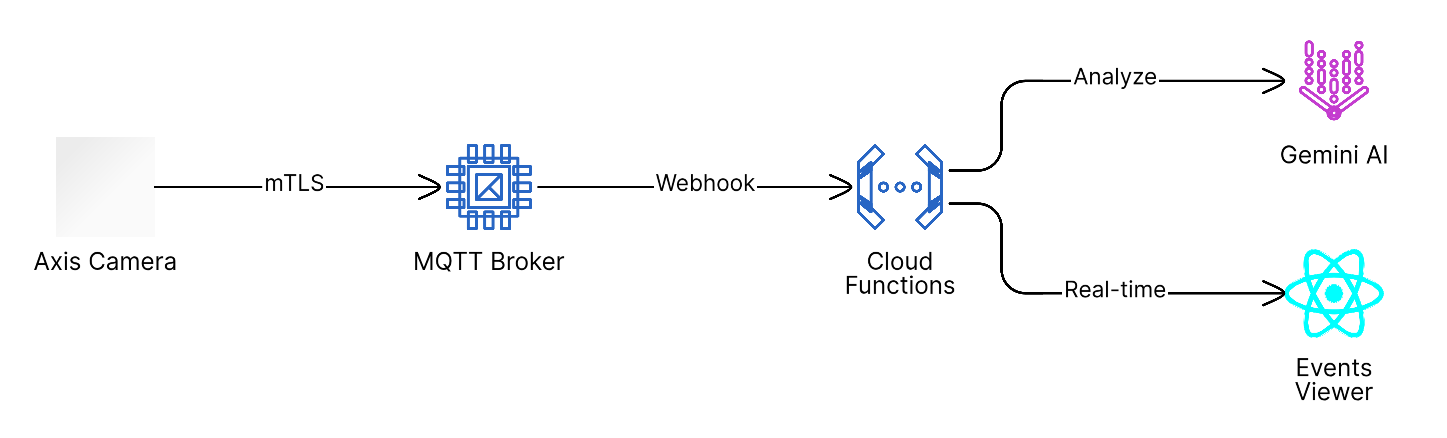
Key concepts:
- Cameras detect events (motion, objects, digital inputs) and send them to the cloud
- AI analyzes images using Gemini models to identify objects, count people, detect threats
- Results appear in real-time on your dashboard with optional alerts and actions
Deployment Overview
Anava deployment follows four steps, guided by an interactive onboarding wizard:

| Step | What Happens |
|---|---|
| Connect | Install the Chrome extension for camera discovery |
| Discover | Find cameras on your network and register them |
| Configure | Create Skills (what to detect) and Profiles (when to trigger) |
| Verify | Test the system by triggering an event |
Step 1: Deploy Infrastructure
Install to Your GCP Project
- Visit the Anava Web Installer
- Sign in with your Google account
- Select or create a GCP project
- Click Deploy and wait for infrastructure provisioning (~15 minutes)
The installer provisions:
- MQTT broker (e2-micro VM with mTLS)
- Cloud Functions for event processing
- Firestore database
- Firebase Hosting for the dashboard
- Vertex AI / Gemini API access
Access Your Dashboard
After deployment completes:
- Click the link to open your Events Viewer dashboard
- Sign in with the same Google account
- You'll see the onboarding wizard
Step 2: Connect - Install Chrome Extension
The Chrome extension enables camera discovery on your local network.
- When prompted, click Install Extension
- Add the "Anava Camera Discovery" extension from Chrome Web Store
- Pin the extension for easy access
- Return to your dashboard - the extension status will turn green
The extension only runs when you're on the Anava dashboard. It doesn't collect data or run in the background.
Step 3: Discover - Add Cameras
Using the Camera Wizard
- Click Find Cameras to scan your local network
- Select cameras from the discovered list
- Click Add Selected Cameras
The wizard will:
- Extract the camera's 802.1AR certificate
- Register the camera in your Anava project
- Deploy the Anava Agent (ACAP) to the camera
- Configure MQTT connection settings
Camera Status Flow

Manual Camera Addition
If automatic discovery doesn't find your camera:
- Navigate to Devices in the sidebar
- Click Add Device Manually
- Enter the camera's IP address and credentials
- Follow the registration flow
Step 4: Configure - Set Up Detection
Anava uses three core concepts that work together:

| Concept | Purpose | Example |
|---|---|---|
| Group | Container for cameras with shared configuration | "Warehouse Entrances" |
| Skill | Defines what AI looks for and how to respond | "Detect weapons and alert security" |
| Profile | Links triggers to skills with scheduling | "Analyze on motion, after hours only" |
Create Your First Group
- Navigate to Groups in the sidebar
- Click Create Group
- Enter a descriptive name (e.g., "Loading Dock - North")
- Assign cameras to the group
Create a Skill
Skills define the AI analysis:
- Go to Skills in the sidebar
- Click Create Skill
- Configure:
- Name: Descriptive name (e.g., "Intruder Detection")
- Objects to Detect: Person, Vehicle, Weapon, etc.
- Questions: "How many people?", "Is anyone loitering?"
- Actions: Alerts, voice announcements (talkdown), webhooks
Create a Profile
Profiles control when analysis runs:
- Go to the Profiles tab in your group
- Click Create Profile
- Configure:
- Skill: Select the skill you created
- Trigger: Motion, Object Analytics, Digital Input, or Schedule
- Schedule: Always, After Hours, Weekdays, etc.
- View Area: Which camera view triggers analysis
Assign to Group
- Return to your Group
- Add the Profile to the group
- Cameras in the group will receive the configuration within 30 seconds
Step 5: Verify - Test Your Setup
Trigger a Test Event
- Create activity in front of a camera (wave, walk past)
- Navigate to Live Events in the sidebar
- You should see an event appear within 5-10 seconds
Understanding Events
Each event shows:
- Captured Frame: Image analyzed by AI
- Detection Results: Objects found, questions answered
- Confidence Score: AI certainty level
- Actions Taken: Alerts sent, announcements made

Dashboard Features
After setup, explore your Anava dashboard:
Monitoring
| Feature | Description |
|---|---|
| Detections | Overview of all detection configurations across groups |
| Live Events | Real-time event stream from all cameras |
| Vector Search | Semantic search across captured images |
Insights
| Feature | Description |
|---|---|
| Analytics | Activity trends, device performance, time patterns |
| Fleet Health | System-wide alerts and camera status |
| AURA Insights | AI-generated reports and recommendations |
Configuration
| Feature | Description |
|---|---|
| Devices | Camera management, status, and settings |
| Groups | Organize cameras into logical groups |
| Skills | Define AI detection behaviors |
Admin (Admins Only)
| Feature | Description |
|---|---|
| Users | User management and role assignment |
| Audit Log | Enterprise compliance logging |
| Updates | System updates and version management |
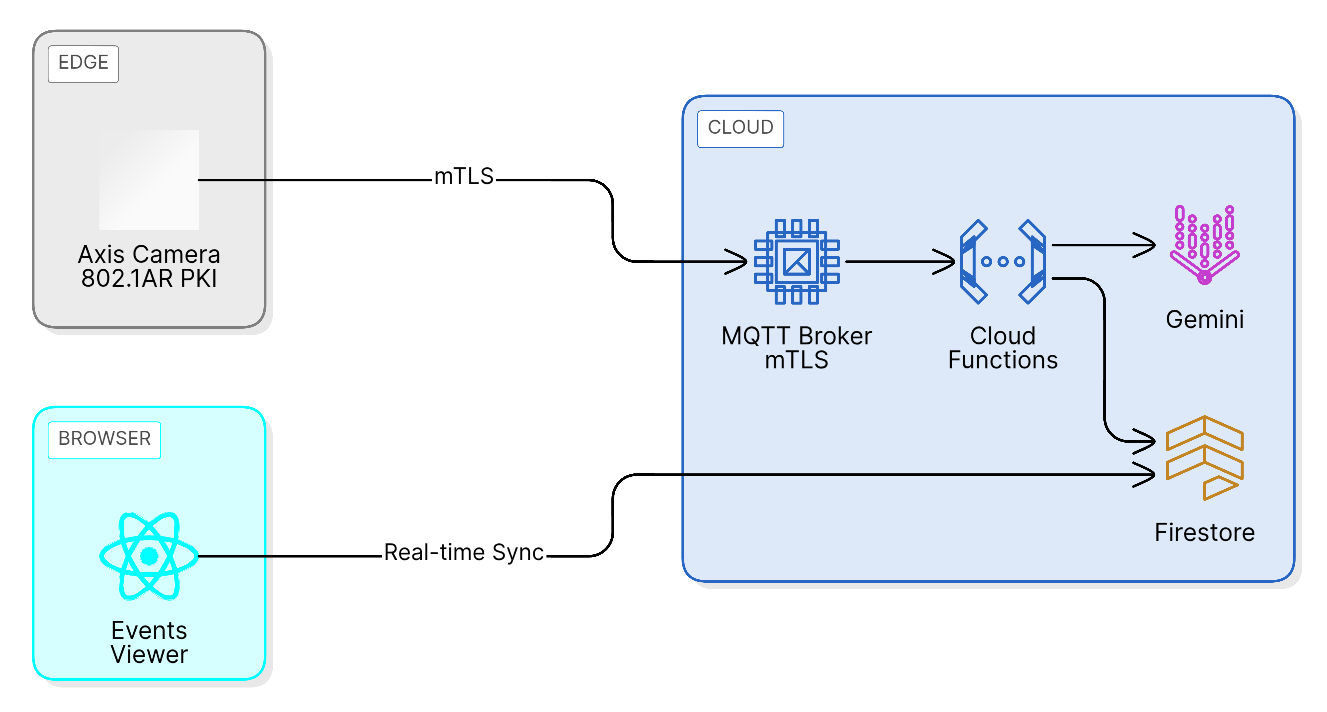
Architecture Overview
Next Steps
Now that your system is operational:
- Initial Setup Guide - Detailed configuration walkthrough
- Architecture Overview - Deep dive into system design
- PKI Authentication - How 802.1AR certificate authentication works
Troubleshooting
Chrome Extension Not Detected
- Ensure Chrome is your browser (Firefox/Safari not supported)
- Check the extension is enabled in
chrome://extensions - Refresh the dashboard page
- Try clicking the extension icon to wake it up
Camera Not Discovered
- Ensure camera and browser are on the same network subnet
- Verify camera supports IEEE 802.1AR (check Edge Vault in camera settings)
- Check camera's web interface is accessible
- Try manual IP entry if discovery fails
Camera Stuck in "Deploying"
- Check camera has internet access to reach GCP
- Verify MQTT broker is reachable (port 8883)
- Review camera logs for ACAP installation errors
- Try removing and re-adding the camera
No Events Appearing
- Verify the profile is Active (not disabled)
- Check camera status shows Online in Devices
- Ensure trigger type matches your test (motion vs digital input)
- Verify schedule allows current time (e.g., "After Hours" won't trigger at noon)
Authentication Failures
See the PKI Authentication guide for certificate-related issues.
Getting Help
- Documentation: Browse the full docs at docs.anava.ai
- Support: Contact support@anava.ai for enterprise customers
- Community: Join our Discord for community discussions