Installation Guide
This guide covers the installation of Anava for your Axis camera deployment. Anava uses a web-based installer that configures cloud infrastructure and provisions cameras automatically.
Prerequisites
Before installing Anava, ensure you have the following:
Hardware Requirements
| Component | Requirement |
|---|---|
| Cameras | Axis cameras with ACAP 4.0+ support (firmware 11.0 or later) |
| Network | Cameras must have outbound HTTPS (443) and MQTTS (8883) access |
| Speaker | Optional: Built-in or connected speaker for TTS announcements |
Camera Compatibility
Anava works with Axis cameras that support:
- Edge Vault (TPM) for secure certificate storage (IEEE 802.1AR)
- ACAP 4.0 runtime for the Anava agent application
- Native MQTT client for cloud communication
Most Axis cameras manufactured after 2020 meet these requirements. Check your camera's product page for "ACAP" and "Edge Vault" support.
Network Requirements
Anava cameras require outbound-only connectivity. No inbound ports need to be opened on your firewall.

Required Outbound Ports
| Destination | Port | Protocol | Purpose |
|---|---|---|---|
broker.anava.ai | 8883 | TCP/TLS (MQTTS) | Device communication, commands, events |
*.googleapis.com | 443 | TCP/TLS (HTTPS) | Video upload (signed URLs), AI analysis |
*.anava.ai | 443 | TCP/TLS (HTTPS) | Web interface, API |
*.firebaseapp.com | 443 | TCP/TLS (HTTPS) | Authentication services |
Standard Network Ports (typically already open)
| Destination | Port | Protocol | Purpose |
|---|---|---|---|
| DNS servers | 53 | UDP/TCP | Domain name resolution |
| NTP servers | 123 | UDP | Time synchronization |
- Cameras are outbound-only — they initiate all connections to the cloud
- No inbound NAT/port forwarding required — cameras connect out through your firewall
- Port 8883 is critical — this is the primary MQTT channel for all device communication
- Port 443 for uploads — video clips are uploaded via signed URLs to Google Cloud Storage
Firewall Configuration
Minimum Required Rules:
# Outbound from camera VLAN to Internet
ALLOW TCP dst-port 8883 to broker.anava.ai     # MQTT (required)
ALLOW TCP dst-port 443 to *.googleapis.com     # Video upload (required)
ALLOW TCP dst-port 443 to *.anava.ai           # Dashboard/API
ALLOW TCP dst-port 443 to *.firebaseapp.com    # Auth
If your network uses SSL/TLS inspection (DPI), you must either:
- Bypass inspection for camera traffic to
broker.anava.ai:8883, OR - Allow mTLS certificates — Anava uses IEEE 802.1AR device identity certificates for mutual TLS authentication. DPI systems must allow the camera's factory-installed certificate chain.
Blocking or modifying the mTLS handshake will prevent cameras from connecting.
Static IP Requirements
Cameras do not require static IP addresses. DHCP is fully supported. The MQTT broker identifies cameras by their device certificate, not IP address.
Account Requirements
- Google account for Anava dashboard access
- Browser with Chrome extension support (Chrome, Edge, Brave)
- Admin access to camera web interface
Deployment Options
Option 1: Web Installer (Recommended)
The web installer handles all infrastructure provisioning automatically:
- Navigate to https://anava.ai/install
- Sign in with your Google account
- Install the Anava browser extension when prompted
- Add cameras using the extension's scan feature
Option 2: Manual Installation
For environments where the browser extension cannot be used:
- Download the ACAP package from your Anava dashboard
- Upload the
.eapfile to each camera via AXIS Camera Station or camera web interface - Configure the MQTT broker endpoint in the ACAP settings
- Approve cameras in the Anava dashboard as they connect
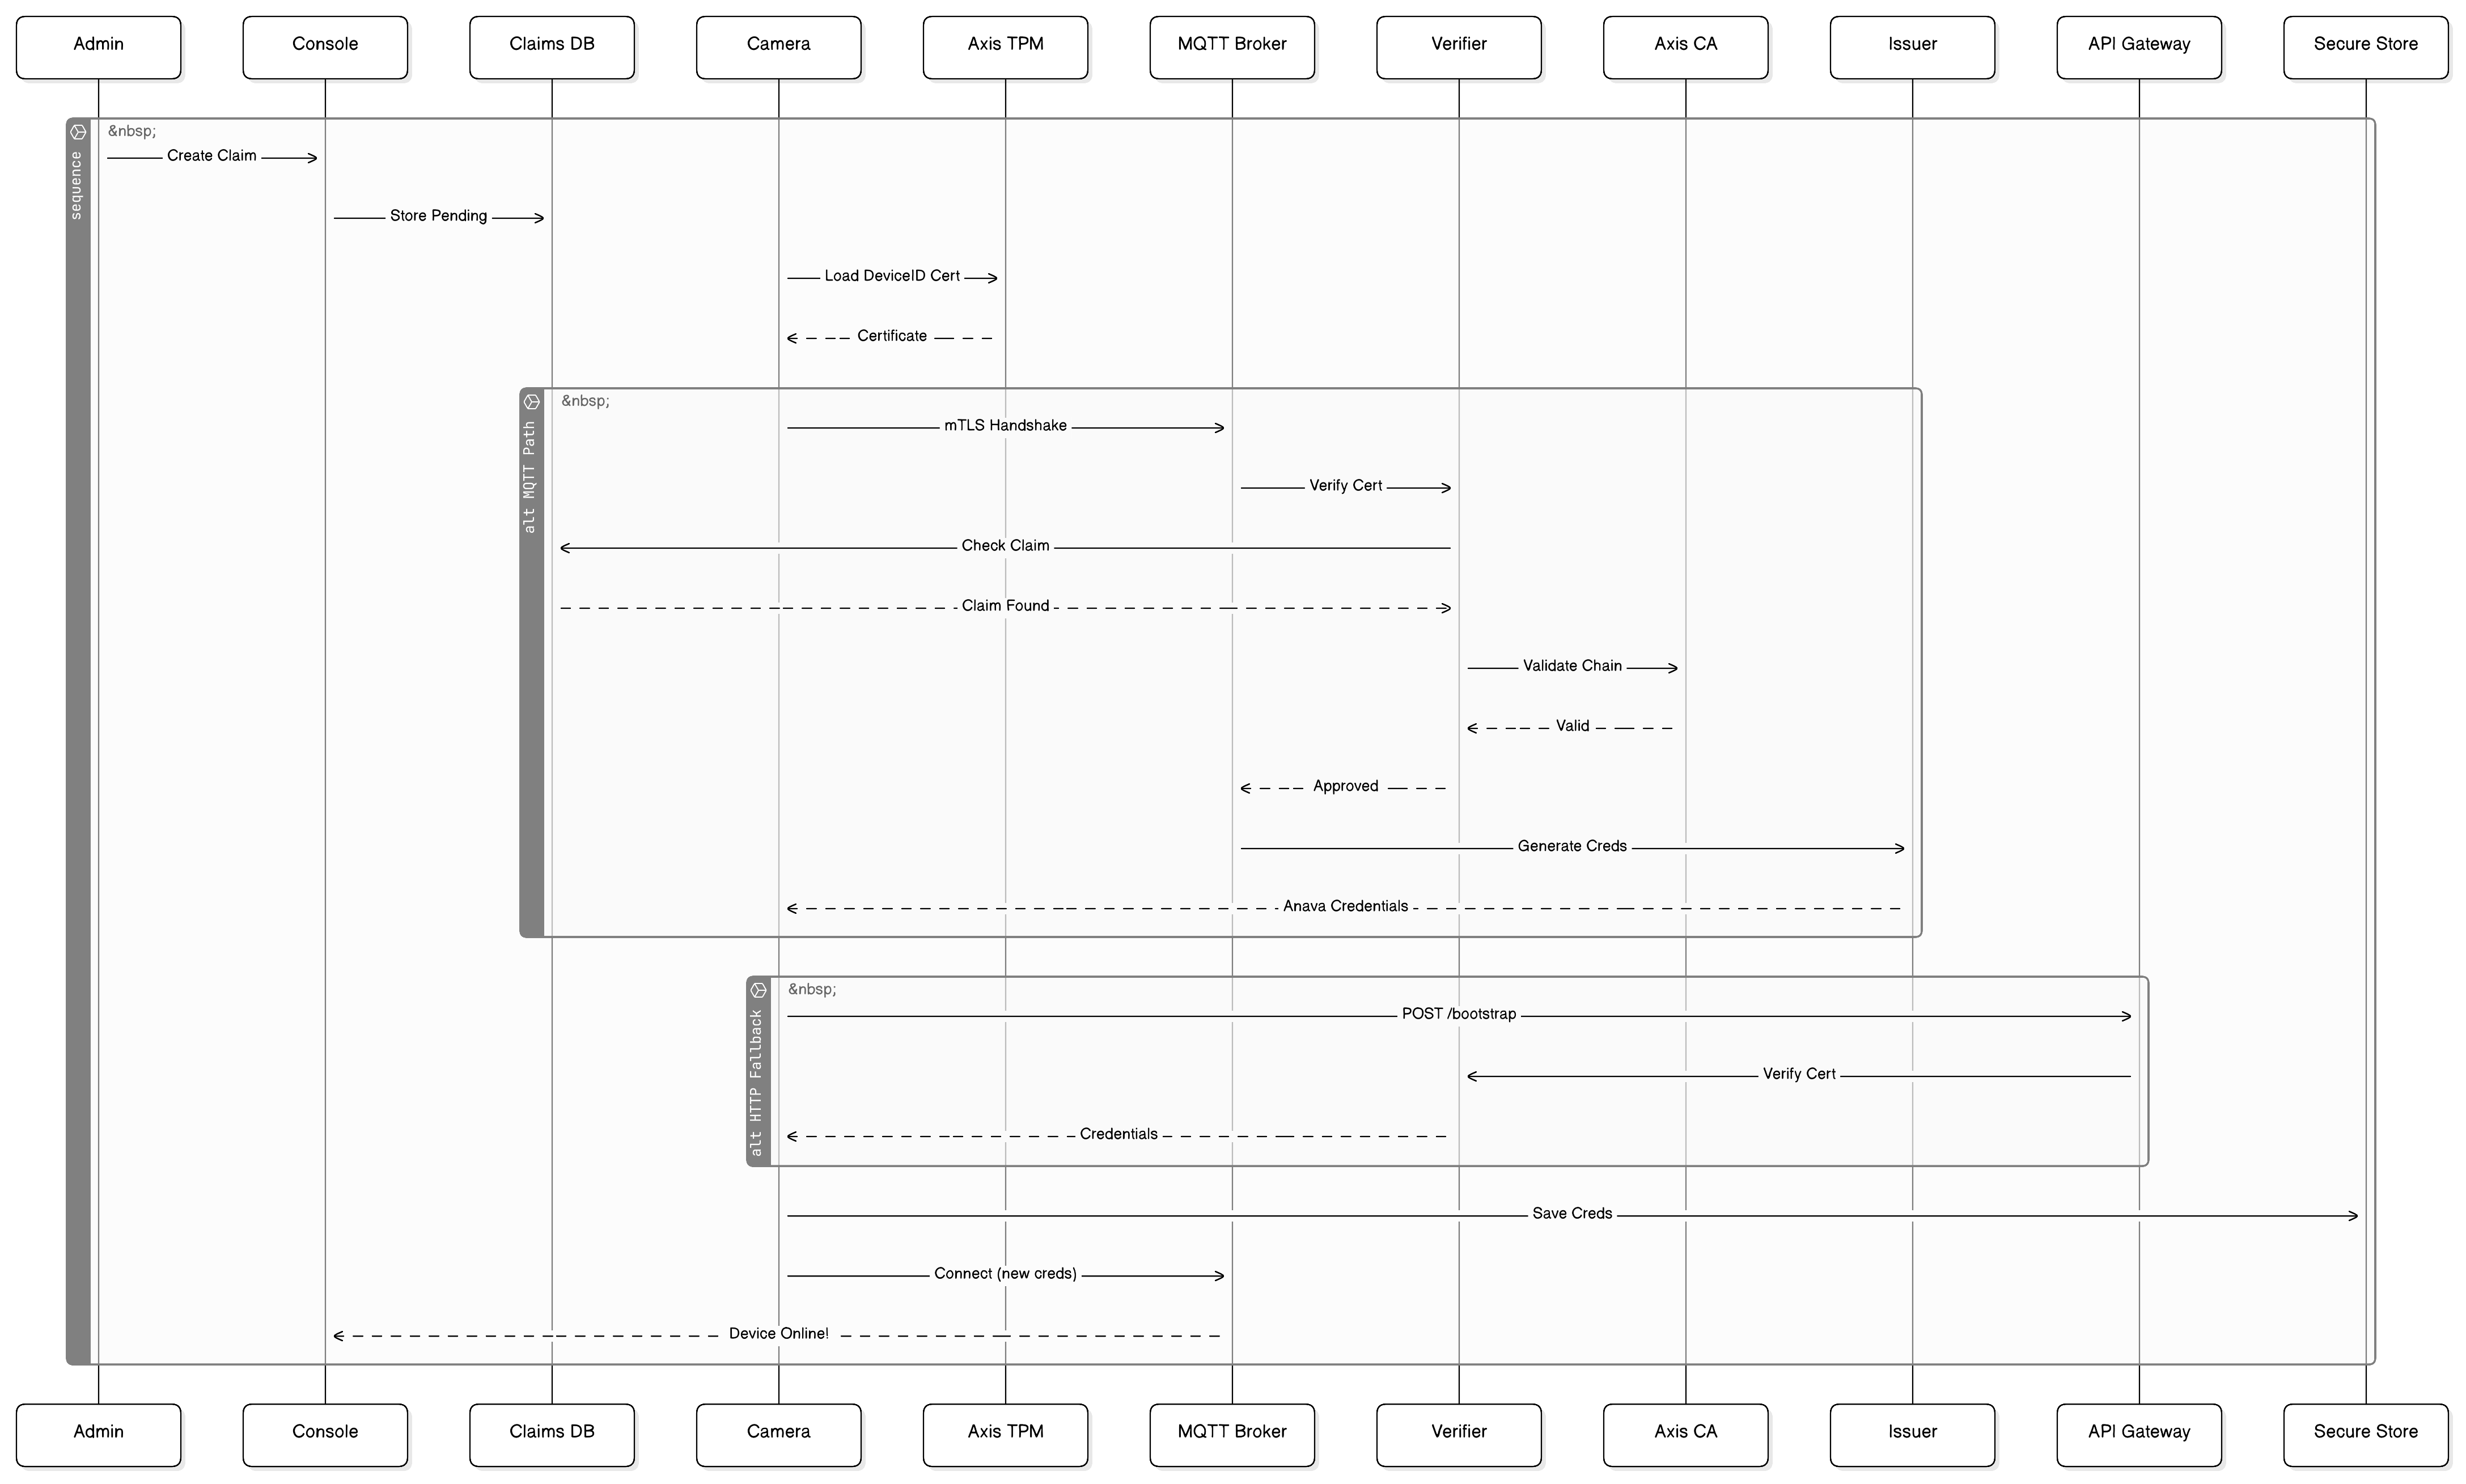
Device Provisioning Flow
The following diagram illustrates how cameras are discovered, provisioned, and connected to Anava:
Step-by-Step Web Installation
Step 1: Create Your Account
- Go to https://anava.ai
- Click Get Started
- Sign in with your Google account
- Accept the Terms of Service
Step 2: Install the Browser Extension
The Anava Extension bridges your browser to cameras on your local network:
- Click Install Extension when prompted
- Add the extension to Chrome/Edge
- Pin the extension to your toolbar for easy access
Step 3: Discover Cameras
- Click the Anava Extension icon in your browser
- Click Scan Network to discover cameras
- Select cameras to add to Anava
- Enter camera credentials when prompted
Step 4: Create Your First Group
Groups organize cameras that share the same detection configurations:
- Navigate to Groups in the dashboard
- Click Create Group
- Name your group (e.g., "Warehouse Entrance")
- Assign cameras to the group
Step 5: Verify Installation
After installation, verify each camera shows:
- Status: Online
- MQTT: Connected
- ACAP: Running
New cameras may take 2-3 minutes to complete initial certificate provisioning and MQTT connection.
Post-Installation
After installation, proceed to:
- Initial Setup - Configure your first detection
- Core Concepts: Event Flow - Understand how Anava processes events
- VMS Integration - Connect to your video management system
Troubleshooting
Camera Not Discovered
- Ensure you're on the same network as the cameras
- Verify cameras have HTTPS enabled (port 443)
- Check that the extension has permission to access the camera's IP range
MQTT Connection Failed
- Verify outbound port 8883 is open
- Check camera firmware is 11.0 or later
- Ensure camera has Edge Vault enabled
Extension Not Working
- Use Chrome or Edge (Safari not supported)
- Disable conflicting security extensions temporarily
- Try incognito mode to rule out extension conflicts
For additional help, see the Troubleshooting Guide or contact support at support@anava.ai.