Event Flow
This page explains how Anava processes camera events, from initial trigger through AI analysis to final actions. Understanding this flow helps you configure effective Detections and troubleshoot issues.
The Pipeline
Anava follows a consistent pipeline for every event:

Stage 1: Trigger
Everything starts with a camera event that triggers analysis.
Trigger Types
| Type | Source | Use Case |
|---|---|---|
| Motion | Camera's built-in motion detection | General-purpose, always available |
| Object Analytics | AXIS Object Analytics (AOAS) | Pre-filtered by on-camera AI (person, vehicle, etc.) |
| Digital Input | Physical I/O port signal | Door sensors, PIR detectors, alarm panels |
| Manual Trigger | Virtual input from VMS or API | Operator-initiated analysis |
| Perimeter | AOAS fence/tripwire scenarios | Line crossing, zone intrusion |
| Schedule | Time-based polling | Active monitoring without triggers |
How Triggers Work
- Camera's analytics detect an event (motion, object, I/O change)
- Camera sends ONVIF event notification to the Anava ACAP
- ACAP matches the event to active profiles
- If a profile matches, ACAP captures a frame and sends to cloud
Use Object Analytics when available - it pre-filters at the camera, reducing cloud costs and false positives. Fall back to Motion for cameras without AOAS.
Stage 2: Frame Capture
When a trigger fires, the ACAP captures a snapshot for analysis.
Capture Configuration
| Setting | Options | Impact |
|---|---|---|
| View Area | 1-8 | Which camera stream to capture |
| Resolution | TINY to ULTRA | Image quality vs bandwidth |
Resolution Profiles
| Profile | Resolution | Use Case |
|---|---|---|
| TINY (128p) | 228x128 | Minimal bandwidth, basic detection |
| LOW (256p) | 455x256 | Low bandwidth, overview detection |
| BALANCED (360p) | 640x360 | Recommended for most use cases |
| HIGH (480p) | 854x480 | Detailed analysis needed |
| HD_720 (720p) | 1280x720 | High-detail detection |
| FULL_HD (1080p) | 1920x1080 | Maximum detail |
Stage 3: Pre-filter (Optional)
The pre-filter stage provides fast, low-cost screening before full analysis.
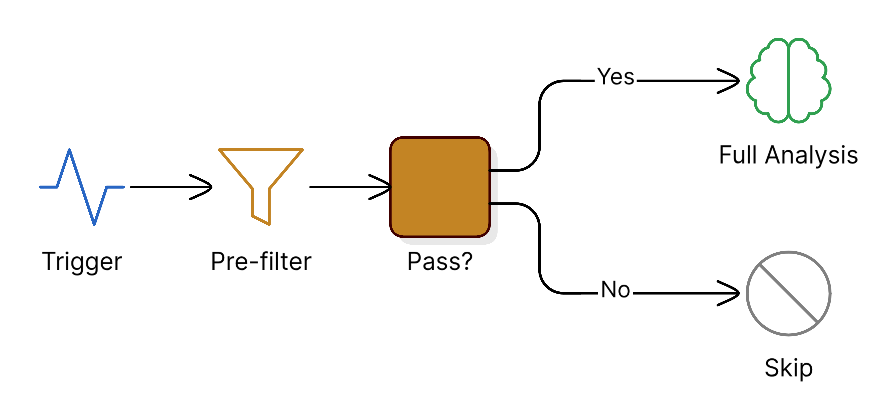
Pre-filter Configuration
In your skill's Analysis Configuration:
- Pre-filter Criteria: What makes an image worth analyzing
- Pre-filter Prompt: Instructions for the fast check
Example pre-filter:
Criteria: "Human presence in frame"
Prompt: "Is there a person visible in this image? Answer yes or no."
When to Use Pre-filter
| Scenario | Pre-filter | Reason |
|---|---|---|
| High-traffic area | Yes | Filter out irrelevant motion |
| Secure area (low traffic) | No | Every trigger is important |
| Motion trigger | Yes | Many false triggers |
| Object Analytics trigger | Maybe | Already pre-filtered by camera |
Stage 4: Full Analysis
The full analysis stage uses Gemini's multimodal AI to understand the scene.
What Happens
- Frame and skill prompts are sent to Gemini
- AI analyzes the image based on your configuration
- Structured response is generated with:
- Object detections (what's in the scene)
- Question answers (structured data)
- Confidence scores
- Recommended actions
Analysis Configuration
| Component | Purpose | Example |
|---|---|---|
| System Prompt | Sets AI context and behavior | "You are a security analyst..." |
| User Prompt | Specific analysis instructions | "Identify any unauthorized persons..." |
| Objects | Items to detect | "Person", "Weapon", "Vehicle" |
| Questions | Structured outputs | "Is the area clear? (yes/no)" |
Temporal Analysis
For Active Monitoring profiles, multiple frames are analyzed over time:
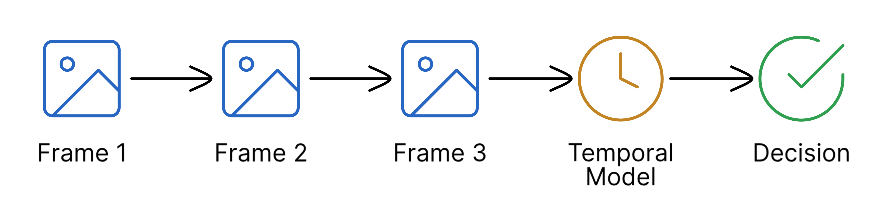
This enables detections like "person loitering" or "crowd forming".
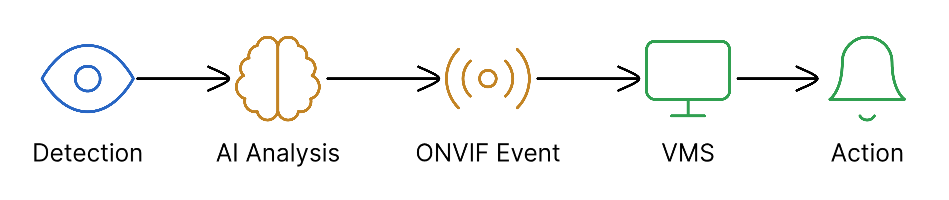
Stage 5: Actions
Based on analysis results, Anava executes configured actions.
ONVIF Events
For VMS integration, Anava emits ONVIF events:
| Event Type | Behavior | VMS Compatibility |
|---|---|---|
| Boolean (Stateful) | True when detected, False when cleared | Milestone, Genetec, ACS |
| Pulse | Single trigger per detection | All VMS systems |
TTS (Text-to-Speech)
When configured, Anava can speak through the camera:
- Automatic: Based on detection results
- Custom Message: Dynamic response based on scene
- Voice Options: Multiple voices and styles
Notifications
- Push Notifications: Mobile alerts
- Email: Detailed event reports
- Webhooks: Custom integrations
Session Lifecycle
Every analysis creates a Session in Anava:

Session Data
Each session contains:
- Captured frame(s)
- Analysis results
- Objects detected
- Question answers
- ONVIF events emitted
- TTS playback status
- Timing information
Timing Expectations
| Stage | Typical Duration |
|---|---|
| Trigger to Capture | < 100ms |
| Frame Upload | 200-500ms |
| Pre-filter | 500-1000ms |
| Full Analysis | 1-3 seconds |
| Action Execution | < 500ms |
| Total | 2-5 seconds |
Actual timing depends on network latency, image size, analysis complexity, and current system load. Active Monitoring sessions take longer due to multiple frames.
Best Practices
Reduce Latency
- Use Object Analytics triggers to pre-filter at camera
- Set appropriate resolution (BALANCED for most cases)
- Enable pre-filter for high-traffic areas
- Use specific, focused prompts
Reduce False Positives
- Configure pre-filter criteria carefully
- Use Perimeter/Object triggers instead of Motion
- Add contextual prompts ("authorized personnel wear badges")
- Set appropriate confidence thresholds
Optimize Costs
- Pre-filter rejects don't incur full analysis costs
- Lower resolution reduces processing time
- Specific triggers reduce unnecessary analyses
- Review sessions to identify patterns
Related Topics
- Detections Overview - The primary concept for AI monitoring
- Skills - Configure what to detect
- Profiles - Configure when to detect
- Groups - Organize cameras and configurations
- Tuning & Optimization - Reduce false positives